I should have the Pinocchio tutorial up soon!
little indian
This is a basic lounge pant and top with a few easy embellishments.
the shirt
I used elements of this tutorial from Just Tutes to make the shirt. (Don't forget to go back and check out her ENTIRE blog when you have time. She has so many useful tutorials and tips and she allows them to be used freely. Plus she has an adorable daughter that gives her own tutorials from time to time.)
If the fabric you are using is not stretchy enough to fit the head through, make a vertical slit in the back of the neck long enough for the shirt to fit over 
your baby's head. I just folded the raw edges under and sewed. Then, attach a button to one side of the slit and a loop on the other to fasten it.

your baby's head. I just folded the raw edges under and sewed. Then, attach a button to one side of the slit and a loop on the other to fasten it.
I used fringe made from strips of felt and other coordinating trims to create the 'V' shape on the chest. This is where you can get creative and add your own touch. Add fringe to the shirt wherever you like. The more the better!
the loincloth
This is just an easy square that is hemmed on the sides and bottom. Fold over the top and stitch close to the raw edge to make a casing for the belt to run through. For the belt, cut a length of fabric long enough to be easily tied around the waist by about 3 inches wide. Fold it in half lengthwise and press. Unfold and fold edges in to the center crease and press again. Fold it in half lengthwise again and edge stitch the two short ends and the long open edge. Simply run that through the casing you've made in the loin cloth.
the pants
 (Ideally I'd have a nice and neat little computer graphics version of this tutorial with a pdf pattern included, but I'm going to need some more time to figure out how in the heck to make one of those. I would LOVE tips if anyone has any. Photos will have to do for now.)
 Find a pair of pants that fit your child comfortably and use them as a guide. Fold your fabric in half. Lay the folded pants on the fabric so that the long side of the pant legs line up with the fold.
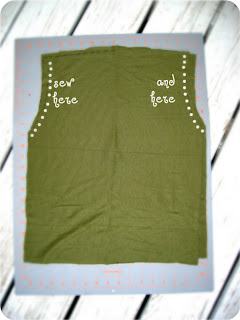
Cut along the dotted line. I usually leave a pretty thick seam allowance, cutting off any bulk when I'm through because it's easier for me to work with, but you leave a seam allowance that you are happy with. Cut TWO of these. NOTE: In the photo, I didn't leave extra fabric at the ankles because I'm want a rough edge. If you want your pant legs hemmed, you'll want a couple of inches of fabric left at the bottom. Hope that's not too confusing.
Place your two pieces on top of one another, right sides facing each other. Sew along both curved edges. This is the seat of the pants so I reinforce this area by double sewing it. Just go back and sew right on top of the line of stitches you just made.
Now rearrange it and lay it out so that the seam is in the center. Sew along the inside of the legs. And by the way, I'm too lazy to use pins for most projects (even for Small Magazine)
but some of you may want to add that step before stitching a seam. You're almost finished!

At this point all you have to do is add fringe wherever suits you, hem the bottoms and add elastic or a drawstring to the waist. There are many sources on the internet that have good directions for this if you are unfamiliar with the process.
the headband
The headband is simply a strip of elastic covered in coordinating fabric. Draw out a feather and use it as a pattern to cut two feathers from felt. This is a good alternative if you are against buying actual feathers. I googled images of feathers as a reference. Once you have your two feathers cut out, use them to sandwich a piece of craft wire. You can use little strips of duct tape to hold it in place. Then topstitch around the wire with matching thread. You can also use the sewing machine to create details of the feather with stitching. Sew the feather to the inside of the headband.
That's pretty much it! War paint adds the perfect touch. OR you can use Elliot's idea and drip blood on it for a gruesome and fierce warrior effect! He says try using fake blood if you aren't into stitches.


